
Whether you are building microservices or exposing backend APIs to web and mobile applications, managing API security, rate limits, and analytics can quickly become complex.
Enter Azure API Management (APIM)—Microsoft’s fully managed cloud service that acts as a secure front door for your backend services.
1. What is Azure API Management?
At its core, Azure API Management acts as an intermediary (proxy) between client applications and backend services. Instead of exposing your databases or cloud functions directly to the public internet, all traffic routes securely through APIM.
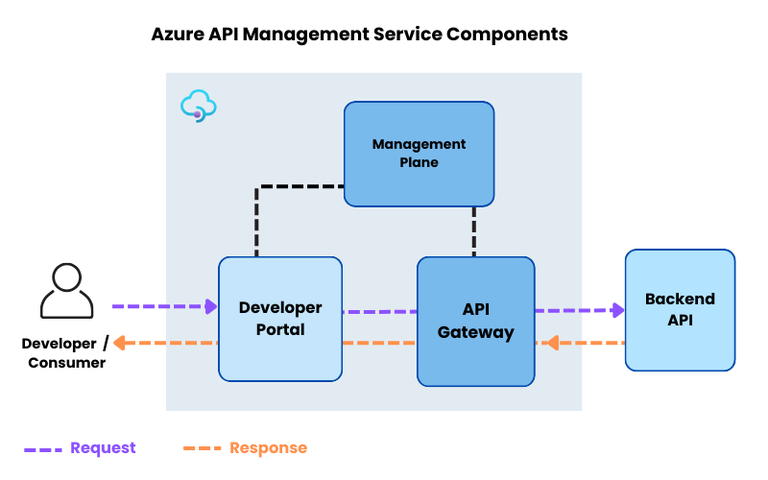
2. Core Architecture Components
Azure API Management consists of three primary components:
| Component | Description | Target User |
| API Gateway | The proxy server that accepts API calls, checks keys/tokens, enforces policies, and routes traffic. | External Applications & Clients |
| Management Plane | The administrative interface in the Azure Portal used to configure endpoints and monitor health. | Developers & DevOps Engineers |
| Developer Portal | An automatically generated, customizable web portal where developers can discover APIs and test calls. | Internal & External API Consumers |
3. Key Benefits
- Centralized Security: Hide backend IP addresses and enforce standards like OAuth 2.0, API keys, or Mutual TLS.
- Traffic Control: Protect backend infrastructure from overload using rate limits and quota policies.
- Transformation: Modify headers, rewrite query parameters, or transform JSON payloads on the fly without changing backend code.
- Observability: Monitor response times, error rates, and request volumes directly via Azure Application Insights.
4. Hands-On: Setting Up Your First API
Step 1: Provision the Instance
- Navigate to the Azure Portal and search for API Management services.
- Select your Subscription and Resource Group.
- Choose a pricing tier (e.g., Consumption for serverless/light testing or Developer for non-production environments).
Step 2: Import Your API
You can import existing API specifications in seconds using OpenAPI (Swagger), WSDL, or directly from Azure App Services and Function Apps.
Image Suggestion 2: Portal Import Screen
- Graphic: A screenshot of the Azure Portal showing the “Create from OpenAPI specification” form with fields like Display Name and Web Service URL filled in.
Step 3: Configure Policies
Policies in APIM are XML-based configurations executed sequentially on incoming requests or outgoing responses.
Here is an inbound policy example that restricts incoming calls to 5 requests per 60 seconds based on the client’s IP address:
XML
<policies>
    <inbound>
        <base />
        <!-- Limit request rate to 5 calls per minute per IP address -->
        <rate-limit-by-key calls="5"
                           renewal-period="60"
                           counter-key="@(context.Request.IpAddress)" />
    </inbound>
    <backend>
        <base />
    </backend>
    <outbound>
        <base />
    </outbound>
    <on-error>
        <base />
    </on-error>
</policies>
5. Production Best Practices
- Organize into Products: Group related APIs into “Products” in APIM to manage access rights and subscription keys cleanly.
- Enable Caching: Use the caching policy for static or slow-changing backend responses to drastically improve response times.
- Automate with IaC: Define APIM deployments using Bicep, ARM templates, or Terraform for reliable environment reproduction.
Wrapping Up
Azure API Management decouples API gateway logic from backend business code, giving you a centralized location to secure, scale, and analyze your web services.
Would you like to dive deeper into a specific feature for a follow-up post, such as setting up OAuth2 authentication or writing custom policy expressions?